Heart Intelligence Guidance System (HIGS)
Manual version 2.2
Copyright © 2008, William Croft
Please inform us of any additions or corrections you would like to see.
Section headings
Introduction
Nogier's pulse system, the VAS
Thumb positioning / arm positioning
Finding the VAS pulse
Verifying the correct VAS pulse / the "stress field"
Scanning for a point
The "cone" effect
Balancing the ear point
Micromovements over the point
Importance of client body sensations as doorways
Jumpstart for dowsers or AK practitioners
Using the HIGS menus
The light menu
Location menu
Finer points on ear balancing
Rechecking through top level on each action
Yes / No / ratings
Proximal / distal pulse motion
Line work on the ear
Stuck corpus callosum
Clearing your mind of preconceptions or preferences
The sound menu
Community Building
Introduction
We assume you have already read the Lightfield Systems tools page on the website for the background on HIGS and how it can be used with a vibrational toolbox. This manual covers some of the suggestions and guidelines for how to get started using the HIGS system.
As explained in the News document, HIGS provides a way to ask questions of the client's heart-intelligence, that
we can imagine is connected to their higher self, guidance, or higher
level templates. The wisdom at those levels knows the proper colors and
sounds and sequencing to best open the energy doorways.
HIGS provides a way to quickly ask many questions about what is the
most appropriate instrument, color, frequency, positioning, etc. It
does this using a pulse reading system developed by Dr. Paul Nogier,
called the VAS (Vascular Autonomic Signal).
The following manual outlines how to learn this pulse reading skill. However most people learn best by trying and experimenting in the presence of a mentor. If you would like to participate in a small group training class please contact us. At the moment, we are offering the class free to purchasers of any instrument or publication from Lightfield Systems. Please read this manual before attending the class so you are familiar with the terminology.
Nogier's pulse system, the VAS
Nogier and his colleagues developed a whole system of therapy and
practice called Auricular Medicine or Auricular Therapy. (The auricle
is the reflexology map located on the surface of the ear). The material
in this manual gives a very brief introduction to the VAS, but it is
sufficient to get started. You may want to connect up with auricular
practitioners in your area to stay abreast of new developments.
I learned the pulse reading technique from Dr. Michael Adams, N.D., who
now practices in Toronto, Canada. From what I can tell, there are many
schools of thought about auricular work, what are the best techniques,
etc. All I can say is that the technique I learned from Michael is
straightforward and easy to use. Some of the "earlier" techniques he
mentioned seemed quite complex and even unwieldy. So use your judgment
and discretion when talking with other practitioners of auricular work,
sometimes "small is beautiful".
The VAS is measuring a standing wave that forms in the radial artery,
just proximal (i.e. towards the heart) of the wrist joint. This
standing wave is the result of a collision of pressure waves, one
coming from the heart, and one created from the back pressure formed
when the outgoing wave hits the capillaries (small blood vessels) in
the fingertips. The tension in the capillaries is under control of the
autonomic nervous system. As is the general tone of all involuntary
muscle systems in the body, including the heart and muscles lining all
the blood vessels.
So this standing wave created near the wrist is in the form of a
palpable bulge or pressure node that can be felt with the tip of the
thumb. The location and intensity of this bulge shifts under
control of the autonomic nervous system. Hence the name of the system,
the Vascular Autonomic Signal. The bulge actually changes both in
intensity and in location. The high point of the bulge can move
either proximal (toward) or distally (away) from the heart, a slight
distance, say perhaps a sixteenth of an inch.
Initially as you are learning the VAS, you will be aware primarily of
the intensity (the height) change in this bulge. But as your thumb tip
becomes more sensitive, you will also become aware of the
proximal/distal motion of this bulge. This is important because certain
information and discrimination is available from the position changes
of the bulge. This is discussed in a later section.
Thumb positioning / arm positioning
The positioning of the thumb is critical in being able to detect the
VAS correctly. This pulse system uses the thumb instead of the fingers
for measuring the pulse, because the tip of the thumb contains
the most and highest density of nerve receptors of all the fingers. So
don't believe any bad reputation the thumb might have as a pulse
detector, this is a unique system developed in France for this specific
purpose. It is different than other pulse systems such as the Western,
Chinese or Ayurvedic.
Typically when working with a client, they will be laying on their back
on a table. You will then be using one of their wrists to measure the
pulse and simultaneously controlling your instruments. Hence you will
want to use your non-dominant hand (left hand for most) to measure the
pulse, while leaving your dominant (right hand for most) free for
holding your various tools.
If the client is laying down, the best arrangement is to use a small
side chair (and pillow) or simply a wide table to allow them to bend
their (usually) left forearm back towards you, where you are sitting in
a chair at the head of the table, just a foot above their head. You can
use pillows or pads to support their arm in position, and also to give
your own arm and hand some support as it measures the pulse over
sometimes extended periods.
It is also possible to use the VAS where both the client and
practitioner are sitting in chairs. In this case you will want to have
your knees almost touching and reach over with your left hand to hold
the client's right wrist. Make sure that they relax the arm and hand
fully if using this seated position. Their hand should be resting
comfortably, palm up, on their right leg.
Finding the VAS pulse
Once you have the arm positioned comfortably, you can now begin to
search for the VAS pulse bulge we mentioned earlier. As we noted, the
most sensitive part of the thumb is the tip. However this is also a
very small area, only about a quarter inch in diameter. While searching
for the pulse, it is helpful to have a wider area to work with.
Therefore it is helpful to use the whole flat of the thumb while you
are searching around for the bulge. Then when you have it
approximately, rock up your thumb to about a 45 degree angle and
position the bulge precisely under the center of your thumb tip.
The radial artery is the artery that runs along the side of the radius
bone of the forearm. This is the bone that is on the same side of the
forearm as the thumb. The pulse bulge is located at the wrist position,
or slightly proximal (say up to an inch) away from the wrist (towards
the heart).
When in final position, you want to have your thumb in the same
alignment as the direction of the client's arm. Parallel to their arm.
As in the following figure:
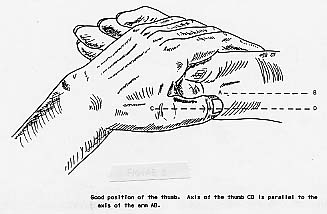
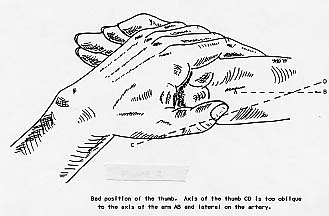
Do not have your thumb at an angle, if you do that you can distort some of the measurements.
Verifying the correct VAS pulse / locating the "stress field"
Once you have your thumb tip over the bulge, you will want to verify
that it is picking up the correct VAS response. We do this by inducing
a VAS response, then noticing the pulse change. There are several ways
to create a VAS response, but perhaps the easiest is a concept I
believe was developed by Michael Adams. He says that there is a "stress
field" around the body. In other words, the more stressed you are, the
larger is this field. The less stressed, the smaller is the field. The
field is like an envelope or bubble around your body. You can imagine
that when you are maximally stressed, you would not want anyone
standing within several feet of you!
This is kind of like the idea of an "aura", but in reverse. With the
aura, the bigger the better, your energy can be really expansive. With
the stress field, bigger is more stressed. The idea is that during the
treatment session, as the client's stress field reduces, you will be
able to measure it using this technique. And as the session is just
starting out, you will be able to see where that stress field is
initially located. When the session is done, the stress field will
actually reduce to near zero, and you will be able to measure that also.
You can measure the boundary of this so called stress field by using
what is called a "waver". (Because we are going to be waving it back
and forth in a moment.) This is a piece of paper, what we might call an
intention amplifier
, on the piece of paper is written the intention, "locate field
boundary". What you do is hold that intention in your mind, as you move
the piece of paper towards and away from the client's body. You
basically "bounce" the paper on and off of the boundary, locating it in
space. As you are doing this, the pulse will register. It will get
stronger as you contact the boundary, then drop off as you go away from
the boundary. Normally the waver is moved in and out from the surface
of the person's ear, but you can use any part of their body; the ears / head is simply right in front of you if the person is reclining.
This then is the test we use to verify that our thumb position is
located correctly. If you do not locate the stress field boundary, i.e.
feel the pulse change in intensity, as you wave the waver back and
forth --then you do not have your thumb in the proper position.
There could be several reasons for this: (1) you may be using too much thumb pressure. You need to moderate the use of pressure here. Too little and you will not be able to sense anything. Too much and you will squash the artery so much that the effect disappears. Try experimenting with the amount of pressure you use. It will differ for each client, and you will have to just make the necessary adjustments for that.
(2) Another possibility is that your thumb tip has become off-center from the pulse bulge in the artery. If this is the case, then try using the flat of your thumb again to locate the most prominent pulse bulge and try this procedure again. (Rock up to 45 degrees, check for waver response). You must have the proper positioning to continue with the next steps.
Trying out locating a point on the ear to balance / more intention amplifiers
Because you are developing a sensitivity in your thumb that you did not have before, it is useful to hone your skills with a few intermediate steps, before we introduce the HIGS menu system. It's possible that your pulse skills are already quite sensitive, or that you are a dowser or muscle tester (AK, applied kinesiology) who is accustomed to fine motor and sensory skills. If that is the case, you might be able "jump ahead of the class", and skip to the section below entitled AK Jumpstart. But please scan the intermediate paragraphs to get an overview of what you are skipping. If you attend one of our classes, you will see that the following steps only take a few minutes to do.
It is helpful to use the pulse to experience what it feels like to
"find" a point that needs balancing on the ear. Nogier developed the
auricular system, using the ear as a holographic map of the body. This
is similar to the maps you might be aware of on the feet and hands
(reflexology). However the ear has certain advantages because it has
enervation from several cranial nerves of the brain: the vagus, the
trigeminal and the cervical plexus. Thus it works both holographically
and through the nervous system.
If the client is in a seated position, it is possible to locate and
balance points on the back of the hand. You would use the opposite hand
to the one you are reading the pulse on. However the ear system usually
has the more powerful effect.
In the previous section we used an intention amplifier called a
"waver". For work in the auricular system, we can benefit from two
other intention amplifiers. Again these are just small pieces of paper
with an intention written upon them. 3M Post-It pads (stuck back to
back) are handy for this. One of the papers should say "Find Causal
Chain points (neck/chest)". The other paper is labeled "Remove
Blockages (arm)".
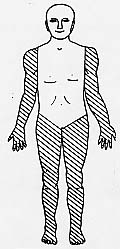
The figure below shows a map of the body indicating which areas are
enervated by the parasympathetic branch of the autonomic nervous
system. And which areas are enervated by the sympathetic branch.
Basically the arms and legs are sympathetic, and the head and torso,
parasympathetic. Michael Adams says that any substance or intention
placed in the sympathetic zones removes micro-information from the body. Conversely, intention or substances placed on the parasympathetic zones adds micro-information to the body energy system.
To facilitate finding out-of-balance points on the ear, we use these
two intention amplifiers. The paper "Find Causal Chain points
(neck/chest)" is placed on the chest below the neck. This asks the
energy field of the body to please present a point on the ear that
would like to be balanced. If we imagine that the imbalances or
stresses occurred to the person in a certain order, this intention unwinds the stresses in a reverse order. Basically untieing the knots of stress one at a time, going backwards in time.
The second intention "Remove Blockages (arm)" is placed on the arm.
Since this is a sympathetic area, it asks the body to remove the
influence of any blockages in the body bio-information transfer system.
This is so we get clear information about which are the correct points.
Sometimes blockages can occur in meridian energy flow due to scars or
other trauma existing in the body. This intention temporarily removes
that "short circuit" in the system.
If the client is seated instead of laying down, you can place the
amplifiers in other convenient locations, for example you could use the
leg instead of the arm. And you could place the "Find Causal Chain"
amplifier on the shoulder, near the neck.
Scanning for a point
Now we are ready to actually find a point on the ear that would like
to be balanced. This is most easily done with a small penlight
flashlight. This type of flashlight has a type 222 bulb with a small
glass lens on the tip of the bulb. This usually casts a nicely defined,
small circle of light, about 3 inches wide when the penlight is about 6
inches from the surface of the ear.
You will be scanning the ear that is closest to your dominant hand,
usually the right ear. In 99.9% of the people I work with, the brain
circuitry (corpus callosum) is open enough so that working on the right
ear, works on both sides of the body.
The point is found by slowly scanning the beam of the penlight, first
left to right, right to left over the surface of the ear. As the edge of the beam crosses the point, a response will occur in the pulse. Basically this response shows you a shallowly curved line on
which the point lies. You can try bumping into the point from both left
and right and verify the location of this line (the pulse will increase
in each case).
Now you will do a similar scanning, but with the beam going from top to
bottom over the ear. This will give you the location of another line,
intersecting the first line you found. At that intersection is the
point we are looking for. This procedure basically gives you that X and
Y coordinate of the point. You can now try bumping into the point from
different sides and angles to verify that you have found it correctly.
You can also verify the point location by using a small pointer, say a
pen or pencil. As the pen or pencil gets over the point, the pulse
response will occur. Note that the pointer tool is a bit harder to use
than the "line" tool of the flashlight, because the line tool searches
across its entire length of the beam, whereas the point is only a
point. Thus for beginners, it may be easier for you to find points
using the penlight than with a pointer tool.
The "cone" effect
Here is another fine point that occurs when using a pointer tool. It
is good to be aware of this now, because you will eventually use the
pointer tool on your HIGS menus, and you want to be aware of this
phenomena.
Sometimes when trying to locate a point or a menu choice, there are several competing points
or choices. I.e. several choices are possible, but usually, one choice
or point is the strongest and best candidate. Michael Adams says that
the points give off what you could call a "cone" of energy or detection
ability.
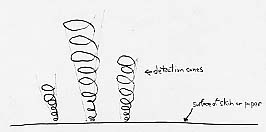
Several points may be giving off weak signals, and if you start
scanning with your pointer at a close distance above the surface, your
pointer will be fooled by the possibly many weak choices of points that
are competing with the stronger point.
So the best strategy for using a pointer, is then to start scanning at
some distance from the surface of the ear (or piece of paper in the
case of a HIGS menu). You might start out at say 6 or 4 inches from the
surface. So you will be scanning in parallel to the surface, 6 inches
above it at all times. The stronger choice will have a wide cone of
effect on the pulse and you will pick it up even at this distance. Now
that you have found the edges of the energy cone, you will see that it
has a certain diameter (say 1 inch wide from 6 inches off the surface).
As you continue to scan, bringing your pointer closer to the surface,
the energy cone will come to a point and your pulse will show that the
cone is narrowing, until you finally reach the surface and hit your
point. (Phew, it is easier to just see this than describe it!)
Instead of the "energy cone" idea, you can also think of this as a hand-eye coordination effect. Scanning at a distance above the surface allows your eye to take in a wider area of prospective points and choose the one with the most (greatest) response. If you are scanning too close, you don't get this "comparison" effect.
Balancing the ear point
Well, now that we have found the point, we might as well balance it,
eh? The idea is that in applying a stimulus to the point, information
flows from the point on the map to the point inside the body and
circulation and life force increase at this point. An energy doorway
opens. The stimulus can be for example, a dot of light, or pressure or
touch from an object (pen cap, crystal tip, etc.)
When I use my menu system on most clients, and the menu has asked for
ear balancing, it has generally indicates to start with the red laser
pointer; this seems to be a common pattern for the first several
points. This is perhaps because the red laser pointer is a strong
energy effect, being coherent, narrow bandwidth light.
If you don't have a laser pointer, but do have a CPL pen, try
choosing a red filter, since red is good, physical level color to start
out with. If you don't have any kind of light pen, just use the cap
from a ballpoint pen or some other gently rounded object. You don't
want to poke the person! Nor use too much pressure, just a light touch.
With the laser you do not need to touch the ear point with the tip of
the pen, but with the CPL or pen cap you would.
So if you now take out your pointer, and aim it or touch it at the
point we just found. All the time you can monitor the pulse. It should
help you to keep the point centered while you are balancing it.
Micromovements over the point
While you are over the point, experiment with slow, very tiny movements from side to side or top to bottom. I call these micromovements. You are probably just moving less than a 1/16 of an inch, back and forth over the point. As you go back and forth, you will notice the edges of the point indicate with the pulse. It is like a little wall around the point. When you first start balancing the point, the pulse and the edges feel somewhat spiky and hard. As you stay longer on the point, a minute, two minutes, etc., you will notice the point and edges start to feel more soft and mushy. Sometimes also the pulse will return to complete normal (like you even weren't there). Both of these are signs that the point is "complete", and the bioinformation got through.
Importance of client body sensations as doorways
I frequently start off my sessions with using the Qigong Machine at
the clients feet. I explain to them my impression that all the cells in
the body have consciousness, and that when we place our attention on
the sensations that are happening in the body, it gives the cells more
permission to communicate with each other and also to raise that
cellular awareness to our conscious attention. It basically gives
everybody more permission to network. I go on to use the Qigong Machine
briefly at their shoulders and head, also asking for feedback.
With this as background, it then becomes more easy to check in with the
client during the session to see what is going on inside. It also
focuses their awareness away from the mental chatter and analyzing,
into a more whole body wisdom. It is the case that sometimes these
sensations are doorways into other awarenesses. For example, something
that first starts out as a sensation in the chest or heart area, may
transition into connection with the underlying emotions in that area.
Or the sensation may bring up an insight or awareness about how some
body armoring came into place.
So after a series of balancing points or sequence of balancing steps in
the menu system, I take notice of where the client is at, and sometimes
ask them what they notice going on in the body. Even as I am starting
the first point or step in the session, I ask them to tune in and see
where they might feel this.
AK Jumpstart
Here is the point where our AK practitioners or dowsers might be reentering. (Others can skip this section if desired). The section following this one discusses the use of the HIGS menu system. The classic way that dowsers or AK'ers "train" themselves to detect a response is to use the phrases: "show me a yes", and "show me a no". The response is either coming from internally (e.g. with a pendulum or L-rod), or from the client (muscle testing).
You can train yourself with the HIGS menu the same way. With your thumb in position on your client's arm, with your other hand, scan your pen at a distance of 4 inches or so over the HIGS menu card, in the lower right corner. This area contains the letters Y and N aligned vertically. Standing for yes and no. The M and D stand for more and done, discussed below. See if you can get a yes/no response from the pulse with your scanning over the Y N area on the menu card. The pulse will increase in strength over the appropriate letter, if you are picking it up correctly. Start at a distance of 4 inches or so, then slowly get closer to the card as you verify the boundaries of the "cone" effect discussed in the previous sections.
If all this goes well and you are getting a response, continue below. Otherwise you might want to increase your thumb sensitivity by doing the exercises in the above sections.
Using the HIGS menus
OK, now we are ready for the actual use of the HIGS menu system to
guide the session. The ear balancing mentioned above was just a
training session for our scanning of the menus we will be using to make
choices. We normally only use the ear balancing if the pulse asks for
it via the menus. The HIGS menu system uses the same pulse read out as
we learned on the ear points, to guide the selection of tools and
parameters during the session. Instead of scanning the surface of the
ear or hand for points, we are scanning the surface of a piece of
paper, which contains choices about which instruments and parameters to
use.
You might wonder, how does this all work? Well, think of this. Remember
back when we balanced the point on the ear. If this was just a
physiological response, i.e. if the body knew where the area of
imbalance and stress was, why couldn't it just balance that area
itself? What good is bioinformation if the body already has the
information?
Well my take on this is, the bioinformation is coming from some higher
level, some heart intelligence or higher level template that knows the
imbalances and what might influence the physical body to start
unwinding the knots and reconnecting itself. So this same higher level
wisdom is capable of guiding our more global choices of instrument,
color, etc.
It also makes sense if you realize that the pulse is capable of
responding to a map of the ear or body on a piece of paper. The only
way this could be working is with some kind of shared consciousness
system, wherein this higher wisdom source is aware both of the status
of the clients body and the position of your pointer over the paper or map or ear.
It is also not that hard to conceive of, given the success of
kinesiology or dowsing systems that ask the same questions. I like to
think that the pulse system here is a little more objective, since it
involves two consciousnesses instead of just one (dowsing), and it
certainly is less strain on the client when many questions must be
asked (kinesiology). Many dowsing and kinesiology practitioners ask
their questions silently, with simply a conscious link to the client in
question.
The figure below shows a recent HIGS menu card. Don't print this card
out for your own use, instead use the "higs_menu.pdf" file on the disk.
Jpeg files and browsers do not always print to scale, and you want the
card to be it's full size, which is 3 inches by 5 inches.
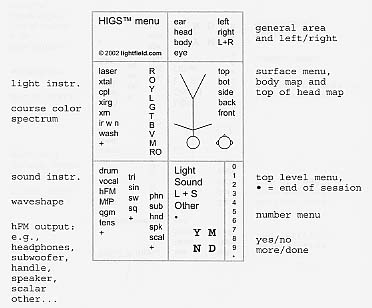
The first question of the session uses the "top level" menu, which
asks, "which is the next class of instrument" we will be using:
Light
Sound
Light+Sound
Other
•
The HIGS menus are laid out in 3M Post-IT size blocks on the card. This
is convenient for customization, but use any format that is best for
you. I find the two inch length (arranged vertically) of the post-it's
is about the right distance that I can scan easily with my pointer and
not miss anything.
So try this yourself, scan this menu with your pointer to see which is
the most appropriate instrument to proceed with. If you get Light, you
would next scan the list of light instruments on the menu card, located
in the middle left. If you get Sound, you would next scan for the
appropriate sound instrument, located in the lower left of the card.
Sometimes we get Light+Sound, this simply means that the pulse wants both
light and sound simultaneously. Light and sound can work together very
synergistically. The Other category is a catch all, that takes us to
another menu with group of lesser used tools. The large dot is what I
call an "end of session" indicator, it is a way the pulse can indicate
the session is complete or the person has had enough to handle in a
session, even if the allotted hour is not yet quite up.
The light menu
Here is the list of light tools on the card:
laser
xtal
cpl
xirg
xm
ir w n
wash
The IR is the 880nm infrared instrument. This comes in both a wide and
narrow beam version. If I get IR by scanning vertically, I next scan
horizontally over the W and N to see which is the appropriate tool.
Some of the menus are setup this way, if a vertical scan gives you a
major choice, sometimes the horizontal dimension shows some of the
subchoices of that main choice.
CPL is the color point tool. We have experimented with other tools,
e.g. Peter Mandel's (the colorpuncture tool), but find the CPL more
effective. I think this is because of several reasons. The CPL beam
intensity is much higher than the Mandel, because the Maglite
flashlight used has a superior bulb and reflector (elipsoidal) system.
The CPL also has a much smaller (1/8" vs. 1/4" diameter) light guide
tip. This results in more accuracy in point illumination. Finally the
CPL has a very much wider color selection available. If the CPL tool is
indicated, then you will need to go to another menu to select the color.
The CPL menu is "two dimensional", it shows the major colors in a
vertical line, then horizontally, next to each major color, are the
various shades of that color (the filter numbers) that can further
refine the color choice.
Using a two dimensional menu such as the CPL, you can pretend you are
scanning for an ear point on this menu and do a horizontal and vertical
scan over the filter number after you initially located it, to verify
that it is the correct one.
XM is the tunable wavelength light source, adjustable in one nanometer
increments throughout the visible spectrum (400 to 700 nanometers). If
XM is the light instrument chosen, then we next ask for the three digit
wavelength number, using the number menu on the lower right of the
card.
XIRG is the Xenon InfraRed Gold medium beam light source. WASH is a
small theatrical fixture (100 watts) that is broadly focused (called a
"wash"). It can be used the same filter pack of over 100 different
colors that is provided with the CPL.
When asking for numbers (e.g. for the XM or a sound oscillator), we
mentally frame the question, "what is the first digit"; then get the
answer. Then "what is the second digit", etc. If you do not know in
advance how many digits are in the "units" portion of the number, ask
"how many digits" first (e.g. you might get 2 or 3). Read out each of
these numbers, then you can further ask for "first digit after the
decimal", "second digit…", etc. That is, if you need the accuracy,
which is sometimes the case with low frequency sound settings.
It is also a good idea when reading out numbers, to double check after
you get the whole number, and reask for each digit again. This is just
a confidence check and will give you more assurance that you have the
right setting.
LASER is the simple continuous wave laser pen pointer. We use an
inexpensive one, without any fancy modulation or infrared capability.
"Xtal", crystal, could be on either the sound or light menu since they
work piezoelectrically with both vibrations. It just ended up here.
The "+" plus sign on the menu(s) has a special meaning, that is to say,
the instrument or choice being requested, is not on this menu! I.e.,
some unforseen option is presenting itself here. Skillfull asking of
yes/no questions (see below) can pinpoint what is being summoned.
Sound menu
Various sound sources are listed here, drum and vocal being the most
obvious ones. QGM is the "Qigong Machine" mentioned on the website. hFM
is the "heart-guided Frequency Modulation" computer driven sound
output; this is discussed more extensively on the hFM disk included
with this HIGS manual, in the "READme.txt" file. Two other related
menus for the hFM are on the card: one to ask the type of waveform, and
another to ask for the transducer type being requested (speaker,
subwoofer, headphones, etc.)
MfP stands for "Music for People", also see the website and newsletter.
This is a simple but powerful technique of working with people (both of
you together) to discover our music that is inside of us. Highly
recommended!
Sometimes practitioners have TENS units or other electric frequency
generators of audible range wavelengths. If you have such devices, you
can list them here.
Location menu
If the instrument chosen has a narrow beam of effect, such as the
point tools, or the medium beam width tools (XM, XIRG, sound
handle-woofer), you will want to ask "where" on the body to position
them. The position menu is located on the upper right of the card. The
choices here are Body, Eye, Ear, Head. If the instrument is already
location specific (for example headphones) or non-specific (e.g.
subwoofer or speaker or "wash", then you can skip over the further
specific choices for location.
If the choice is Body, you can use the (very schematic) body map
pictured on the card. I usually work with this guy in the upside down
position, just because that is usually the orientation of the person on
the table from my perspective. I would first ask, "which surface are we
working on", Top, Bottom, Front, Back or Side of the person. Then I
would scan over the body picture until I got the approximate location.
The "left / right" menu is sometimes helpful for asking about
laterality.
A scan of the pointer (or finger) over the person's actual body would
then pinpoint the location. For this kind scanning over the body
surface, especially when printed clothing is involved, be sure to use
just your pen or finger rather than some kind of penlight or light
pointer on the person's body to scan with. This is because the printed
cloth and light projection through that can interfere with each other,
giving false indications.
After you have the location pinned down, you can then position your
instrument over the area indicated. Sometimes with medium beam
instruments (such as the XIRG or handle-woofer), you might want to
monitor the pulse response whilst moving your instrument towards and
away from the body surface; this can usually indicate a good distance
to hold the tool at during balancing.
If the choice on the location menu is indicated as Head, then again you
can use the little person to ask, is it Top, Front or Back, then use
the pointer to scan over the front or top view of his head to get an
approximate location. Sometimes in my experience, the pulse asks for a
Head point, when in fact what I locate with the pointer is a point on
the throat, i.e. just below the picture of the head. I assume the pulse
is just using that technique to concentrate my attention around the
area of the head for scanning purposes.
Finer points on ear balancing
When using the auricular system according to Michael Adam's
protocol, there are a couple extra steps that add some nice
information. Recall that we used the two little intention amplifiers
when we balanced that trial ear point. His protocol contains this extra
step: after you have finished balancing the point (turns soft / mushy),
you can check to see if the body did indeed "take it", i.e. completely
balance.
You do this by taking the waver, and moving it toward and away from the
ear, as we did earlier to find the stress field location. However this
time you hold the intention, "did we finish this point?" If the point
is indeed done, then the stress field will appear to have miraculously
come all the way into zero. That is, the VAS response will not occur as
you bring the waver in, or only occur within a half-inch of the
person's ear surface. This means that point is indeed done.
Now rarely as you bring that waver in, you will notice that the field did not
come all the way in. This usually means that the point moved a little
bit or shifted location. You can take out your penlight and try to
locate it again; if you do find it shifted, then you can begin
balancing the new location.
Eventually when the point is fully balanced, the field will come in
with your waver and you will know you are done. At that time you can
remove the other two intention amplifiers from the neck and arm. The
stress field will then pop out to its new location, which should be a
little less than what you measured to begin with. This shows you that
you have reduced the stress level by that percentage. After you have
balanced a series of these ear points, the stress level will eventually
come all the way into zero. Meaning there are no more ear points to be
found.
If the pulse asks you to do a subsequent point on the ear, you can then
replace the neck and arm intentions and begin as you did before to
locate the point on the ear.
Rechecking through top level on each action
After you perform one balancing (e.g. through the ear, or by light
or sound elsewhere), you can ask the pulse, "are we done with that last
balance, or is there more to do"? This is easily done with the More
Done (M/D) items on the lower right of the card. Done indicates we are
ready to find the next instrument and location. More indicates that the
last adjustment was not quite complete, and that you should continue it
until you get the feeling or indication that that is so.
More/Done is also helpful during the process of balancing,
say with color thru the eyes or a tone thru a speaker or headphones. As
long as the frequency or color is "doing something" or being absorbed /
processed, the pulse will indicate "more". When the balancing is
complete, it will say "done".
With point work (e.g. on the ear) and the micromovements involved, you
are "constantly" monitoring the pulse while the balancing is going on.
But with sound thru the ears or light in the eyes, you can simply check
back every minute or so and ask "are we done with this adjustment",
which can be less fatiguing than continuous monitoring.
If you do get the Done indicator, you are now ready to go back to the
top level menu (Light / L+S / Sound / Other / . ) Asking again, what is
the most appropriate instrument for this next step? I notice that the
pulse seems to like variety, for example if it is working on ear
points, it may take a break and ask for some sound work or different
kind of light work in the middle of a sequence of points. This makes
sense to me. And if you go through the top level each time, you will
also pickup any color or wavelength changes the pulse is asking for the
next adjustment.
This protocol also guarantees you will pickup the dot indicator when
the session is complete, which could happen after any adjustment.
Particularly if the client has gone through a lot of processing already
in the session; you don't want to give the client more than they can
handle in one session.
Yes / No / ratings
The card contains the Yes / No menu, which you can use for any general questions you might have that can be so answered. Sometimes you might just need clarification on some item, or wonder about something of interest to you or the client. Sometimes I also find it helpful, if the client has questions about the impact of some stressor in their environment, or the efficacy of some proposed treatment --to ask the pulse to rate that item on a zero to nine scale, using the number menu on the lower right to get the answer. You can also get numeric ratings of organ system functionality, as dowsing and AK sometimes does.
Proximal / distal pulse motion
We mentioned earlier that the pulse bulge on the radial artery moves
very slightly say 1/16 of an inch proximal or distally along the artery
during a VAS indication. You will eventually train your thumb so that
it picks up on this. It is a little bit like those piano or guitar
tuners that you see with a plus and minus meter indicator. The needle
of that meter is normally setting right in the center of the meter, but
when the pitch is off, it can indicate how much in the plus or minus
direction.
Well the pulse is a little bit like that. As your thumb gets trained,
you will notice that a downward motion of the pointer across a menu
item (that is, the one that is indicating, the choice being selected by
the pulse), will result in a downward motion of the artery bulge across
your thumb tip. And an upward motion of your pointer across that same
menu item will result in an upward motion of the artery bulge. This
little "meter swing" action, is a verification that you are getting
good and valid readouts.
Very occasionally / rarely, you will sometimes hit a menu indication,
where the motions are reversed. That is, your downward motion over the
menu item will result in an upward motion of the artery bulge, and vice
versa. Just simply, the pulse indication will "somehow feel wrong" on
that item, and usually there is another item on the list that will give
the correct positive pulse motion indication. I am not sure what causes
such "false indications", my guess it is indecision or doubt on the
side of the client or practitioner. Luckily the pulse indication and
your sensitivity is a way out of this occurrence.
Please also be patient with yourself, any new skill requires some
practice, and you will certainly pick it up after your sensory
apparatus sensitizes itself. Also the "cone effect" mentioned earlier
is another good way to avoid any false indications. Just "back off" and
come into the menu slowly, looking for the largest cone.
Line work on the ear
Sometime when doing points on the ear, you will notice that they are clustered, or even forming a small line. (Like a color/connect the dots coloring book!) This perhaps means that somehow the pulse wisdom is asking that we connect up different regions on the holographic map. My impression is that it could be establishing new brain or bioinformation pathways that require more "direction" than the simpler point adjustments.
Stuck corpus callosum
Sorry we are spending so much time on the ear-balancing aspect, this
manual had that original emphasis(!) Very rarely (say one out of every
200 clients?), you might get someone who is only getting bioinformation
from the ear-balancing, to appear on the same side of the body as the
ear you are treating. In other words, the information is somehow not
getting over to the other side. Perhaps the corpus callosum is somehow
shut down more in this person.
The solution in such a case is simple, if a little awkward. You just
balance a few points on the opposite side (the side of your pulse
hand), instead of the normal ear you use. The positioning and stretch
will be little harder than usual, but not significantly. After a few
such points, the left/right communication should have improved, and you
can go back to the original ear for the rest of the points. Keep asking
for feedback on the body sensations to ensure that the channels stay
open.
Clearing your mind of preconceptions or preferences
Of course with any kind of work like this, you will want to be in a space of heart-intelligence yourself. This will allow both you and your client to access the truest part of yourselves. Sometimes you might notice your conscious mind creeping in with certain preferences or ideas about what might be right for this client. Just let that go and perhaps ask, "what are you really asking for?" as you are using the menus. This can help remove any bias on your part towards the responses.
Community Building
We have a Yahoo group setup for discussion and brainstorming about
HIGS, hFM and other vibrational tools. Visit
http://groups.yahoo.com/group/higs , mail is sent to the address
higs@yahoogroups.com .
I've been thinking of doing a video tutorial on the pulse system. Tell
me if you would either like a copy of it, or in helping to produce it.
I feel there is a tremendous amount of synergy that is going to happen
as we learn from each other, and be creative together. Many pieces of
the puzzle coming together.
Best wishes,
--William Croft
HIGS Manual, Copyright © 2008, Lightfield Systems